If you see a blue screen error, but Windows 7 restarts immediately and you can’t read the error text, follow these instructions to disable the Automatically restart option:
- Right-click on My Computer
- Go to Properties
- Go to the Advanced tab
- At the Startup and Recovery section, click the Settings button
- At the System failure section, make sure the “Automatically restart” option is unchecked
- Click OK
If you can’t boot into Windows, try booting into Safe Mode, follow the instructions above and then restart your computer again. To boot Windows 7 in Safe Mode, follow these steps:
- Restart your computer
- Press F8 before the Windows logo appears
- Use the arrow keys and select “Safe Mode” from the boot menu
- Press Enter
Common fixes
To fix Blue Screen of Death (BSoD) errors in Windows 7, you can try any of the following tips:
Tip #1: System Restore
Follow the instructions from Restore Windows 7 guide on how to run System Restore for Windows 7.
Tip #2: Install updates
Similar to Windows Vista, installing recent updates from Microsoft might fix any errors you are experiencing in your Windows 7 system.
If Windows Update isn’t enabled to install the updates by itself, follow these steps to do so manually:
- Click Start
- In the search box, type “Update”
- Choose Windows Update from the list of results
- Click Check for updates, on the left
- Review any pending updates
- Click Install updates
Tip #3: Install the latest drivers
Make sure you have the latest device drivers installed on your system. Go to your computer’s manufacturer and check the driver’s latest version.
Many blue screen errors can be caused by an incompatible device driver. You can try removing any recently installed device driver and restarting your computer.
Tip #4: Check for hard disk errors
Windows 7 has several utility tools that can help you identify and fix certain errors. You can use these utility tools to check for hard disk or memory issues.
Check for hard disk issues:
- Click Start
- Go to Computer
- Right-click on the main drive, where Windows 7 is installed on, and click Properties
- Click the Tools tab and at the Error-checking section click Check now
- Select both Automatically fix file system errors and Scan for and attempt recovery of bad sectors
- Click Start
Check for memory issues:
- Click Start
- Click Control Panel
- Type “Memory” in the search box
- Click on Diagnose your computer’s memory problems from the list of results
- Follow the next set of instructions on the screen
Tip #5: Startup Repair
You can run the Startup Repair tool manually if you have a recovery option preinstalled on your computer, or have the original installation disk, or have the system recovery and repair disk.
If you have Startup Repair preinstalled on the system:
- Remove any CDs, DVDs or USBs from the system
- Restart your computer
- Press and hold F8 as your computer boots, but before the Windows 7 logo appears
- At the Advanced Boot Options screen, select Repair your computer using the arrow keys and hit Enter.
If Repair your computer option isn’t listed, it means that your computer doesn’t have the preinstalled recovery option available. Use the original installation disk or a recovery disk.

- Select a keyboard layout and click Next
- At the System Recovery Options window, click Startup Repair
If you have the original installation disk or a recovery disk available:
- Insert the installation or recovery disk
- Restart your computer
- Press any key to boot from the disk
- Choose your language and keyboard layout (if this option is available), and then click Next
- Click Repair your computer, if you’re using the Windows 7 installation disk
- At the System Recovery Options screen, click Startup Repair
0x000000ED (UNMOUNTABLE BOOT VOLUME)
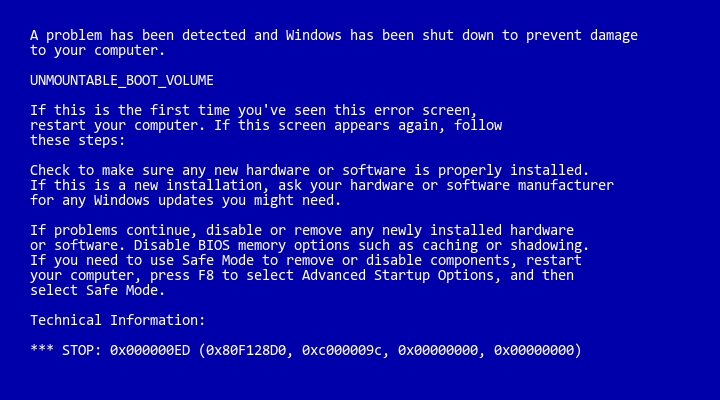
The 0x000000ED blue screen error code is also called UNMOUNTABLE_BOOT_VOLUME.
For situations where the UNMOUNTABLE_BOOT_VOLUME error is caused by incorrect or outdated information regarding the Windows partition in the boot configuration files (BOOT.INI or the BCD) for NTLDR or BootMGR, Easy Recovery Essentials can normally recreate the boot configuration with the correct settings and parameters to allow for Windows to boot correctly:
- Download Easy Recovery Essentials from here. Choose your Windows version (XP, Vista, 7 or 8) before you go to download
- Burn the image. Follow these instructions on how to burn the bootable ISO image very carefully, as making a bootable CD can be tricky!
- Boot into Easy Recovery Essentials
- Choose Automated Repair option and click Continue

- Choose your Windows installation drive’s letter (usually C:\) and click Automated Repair
- Wait for Easy Recovery Essentials to complete the process
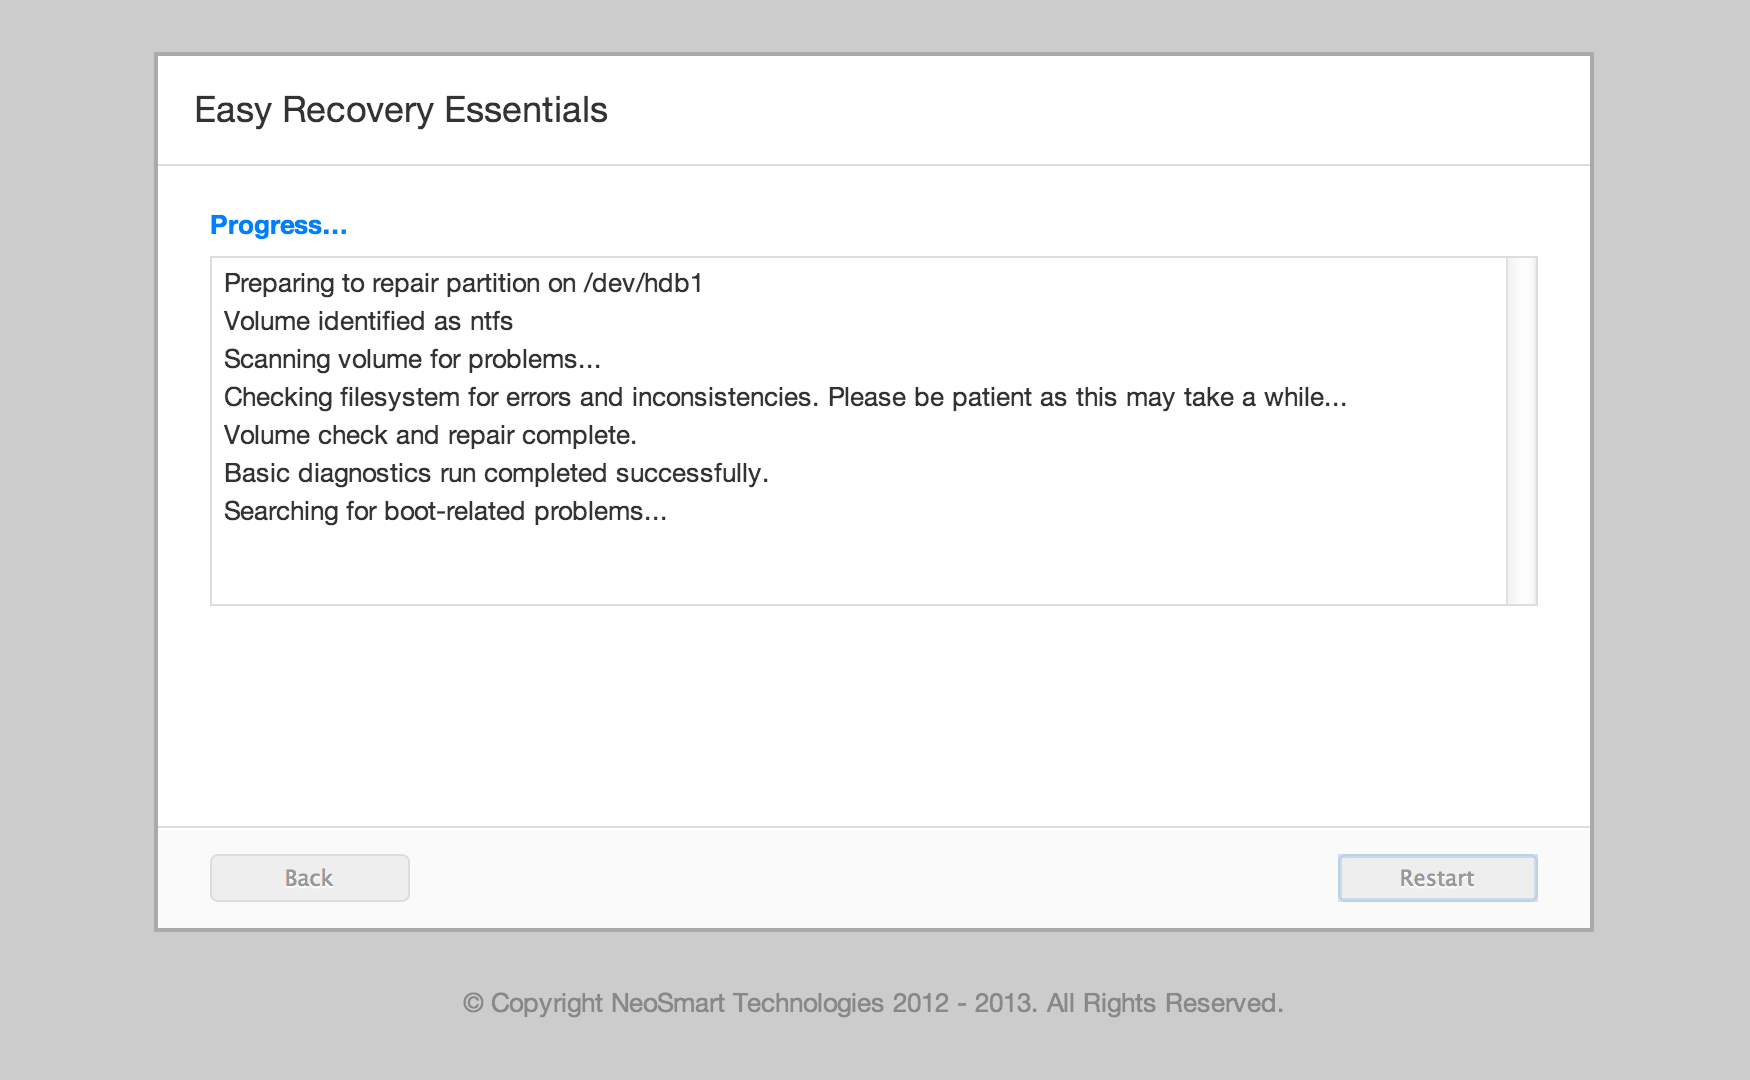
- Once the process is complete, click Restart
For Windows 7, we covered how to fix UNMOUNTABLE_BOOT_VOLUME here.