|
Support for Office for Mac 2011 ended on October 10, 2017 . All of your Office for Mac 2011 apps will continue to function. However, you could expose yourself to serious and potentially harmful security risks. Upgrade to a newer version of Office so you can stay up to date with all the latest features, patches, and security updates.
|


Important note for Office 365 subscriptions: After September 22, 2016, Office 2011 for Mac is no longer available for installation with an Office 365 subscription. This doesn't affect one-time purchases of Office for Mac 2011 such as, Office Home and Student, Office Home and Business, or Office Professional.
Note: If you have Office 365 or a one-time purchase of Office 2016 for Mac, see Download and install or reinstall Office 365 or Office 2016 on your PC or Mac for install instructions.
Mac 2011 Home & Student or Office for Mac 2011 Home & Business (one-time purchase of Office) installation instructions
For one-time purchases of Office for Mac 2011 you can install Office on only one computer. However, you may transfer Office for Mac 2011 to another computer that belongs to you if you experience a hardware failure or you buy a new computer. For more information, see the Microsoft License Terms for your product.
You can use the DVD that came with Office, but to get the most up-to-date version, download Office for Mac 2011 at Download Earlier Versions of Office. Make sure you have your product key.
Note: If your organization subscribes to the Home Use Program and that's how you received your copy of Office for Mac 2011, follow the steps in: Install or reinstall Office through the Home Use Program (HUP).
-
Go to Download Earlier Versions of Office at www.microsoft.com/software-download/office to download the file.
-
Enter your product key and click Verify.
-
Select a language, then click Confirm.
-
When prompted, click Download Now.
-
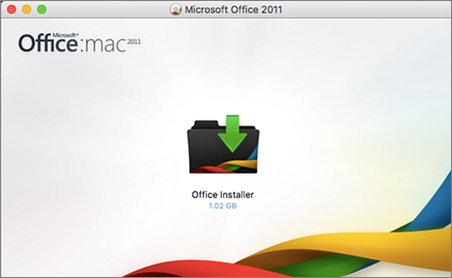
Open the downloads folder from the dock, and double-click the Office_Mac_HB_1PK_2011_<Language>.dmg file to start the installation.
-
Double-click the Office Installer icon.
-
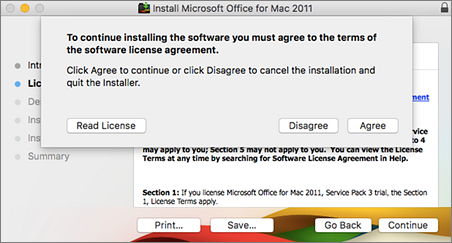
Follow the prompts, and click Agree to accept the terms of the software license agreement.
-
Click Install to continue the installation.
Click Change Install Location if you want to select another drive on which to install the product.
Click Customize to select or to remove optional installation components. For example, click Customize if you don't want to install Office Fonts, Dock Icons, or certain applications such as Microsoft Messenger, Remote Desktop, or Microsoft Document Connection.
Notes:
-
If you use Apple Remote Desktop to install Office for Mac 2011 on another computer on your network, Dock icons are not installed.
-
Duplicate fonts are moved to the Fonts Disabled (/Library/Fonts Disabled folder or the /Users/ username/Library/Fonts Disabled) folder during installation.
-
-
If prompted, enter your Mac user name and password to allow the installer to make changes, and then click OK.
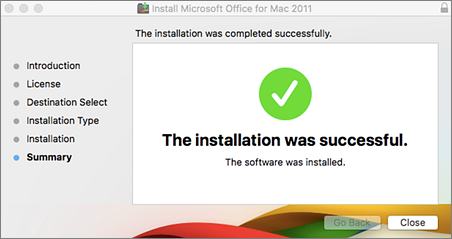
The installation is complete you receive a message that says, The installation was successful. Click Close.
-
When the Welcome to Office: Mac 2011 screen appears, select the option, Enter your purchased product key.

-
Enter the product key from the retail package of Office for Mac 2011, and then click Activate.
-
Save your Product ID information, click Continue, and then click Done.

-
If prompted, install any updates.